Welcome! We would love to have you follow along in our journey, so feel free to choose an option in the right side bar. While you are there, take a look at some of the fabulous blogs that have become our cyber-mentors!
Showing posts with label Preserving the Harvest. Show all posts

Saturday, October 13, 2012

The Glorious Sweet Potato~Easy Canning

As a child I loved it when my mom or grandmother would serve candied sweet potatoes.  They were baked in the oven and covered in marshmallows.  Yum! Now as an adult (and mom) I appreciate these orange beauties for what they really are: a nutritional powerhouse.

Sweet potatoes are a wonderful source of the B vitamins, iron, manganese, potassium, Vitamin A, Vitamin C and iron. They also are full of antioxidants and cancer-fighting agents and their low glycemic index make them a healthy choice for diabetics. Because of their anti-inflammatory properties, I love them because they help me when having a really bad fibromyalgia day.

We grew sweet potatoes for the first time this year and I am happy at our harvest.  Wanting to preserve them for as long as possible, I decided to can most of them.  I got these canning instructions from PickYourOwn.org, and I recommend you head over there for lots more tips and info.


Here are some of our sweet potatoes. The plants were purchased at a local farm supply store, so I don't know their "beginnings", but they were grown and harvested completely organically. I must say, I was surprised at how much bigger they were than those I've bought at the grocery. Some of them were HUGE!

Canning Instructions:

*Wash potatoes and cut off any "tails" (some are pictured above).
*Fill a large pot with water, bring to a boil.
*Cut the potatoes (skins on) to a manageable size for your pot. Mine were too big to put in whole, so I cut them into chunks.
*Cook the potatoes in the boiling water for around 20 minutes, or until slightly tender.
*Get your pressure canner ready while potatoes are cooking. Fill the canner with about 4-6 inches of water and get it heating up (lid off) so it will be ready to use.
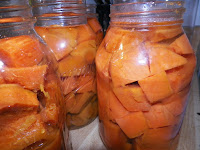
* Drain and peel.
*Cut into smaller chunks, to fit nicely into your jars.
*Prepare your syrup.  After filling your jars, you will need to "top them off" with a sugar syrup. PickYourOwn.org (link above) has some wonderful recipes. I used 8 cups of hot water and 4 cups of sugar, in a sauce pan, heat and stir until dissolved. Keep hot. You may want to prepare this while your potatoes are cooking or cooling just enough to make them easy to handle while peeling.
*Fill your jars. The above syrup recipe was enough for 6 quart jars.
*Add syrup to jars (to fill line, or right below where the canning ring sits)
*Add lids and rings.
*Add jars to pressure canner; can at 10 pounds pressure for 90 minutes. I have the kind of canner with a weighted gauge; PickYourOwn.org has instructions for the dial gauged-kind.

There you go!  Glorious sweet potatoes to fill your pantry.  I like to bake them in the oven with butter and a little bit of brown sugar. How do you serve your sweet potatoes?


Thursday, October 4, 2012

Spaghetti Squash

This post was original to our family blog; link in the sidebar.

This year we had two volunteer plants in our garden.  One of them is spaghetti squash.  I've never even heard of this squash before, let alone plant it, so I have no idea how it ended up in our garden. Manna from heaven, I suppose!

Anyway, much of today was devoted to what may now be my favorite squash. First, I picked a laundry basket full.

Wash off the dirt, cut off stem, then cut in half lengthwise.
Next, scoop out the seeds and stringy "guts". I used an icecream scoop.
Place cut side down in a shallow baking dish with a little bit of water. Bake at 350 for 20-30 minutes, depending upon the size of the squash. Basically, you just want to cook until the flesh is tender. I usually turn it over to cut side up halfway through, though I do not think this is necessary.
After cooking, let cool. Then scoop out the flesh. This is when you will see where the spaghetti squash gets its name.  It comes out looking like thin spaghetti noodles.
Now you can either cook and enjoy, or freeze it.  If you want to cook it, here is a site that offers several recipes.  Many people use this squash in place of noodles...there is even a spaghetti squash lasagna!

To freeze:  There are two different ways that I froze some of my squash today.
The first is to follow the above steps, then pack tightly into freezer boxes (leaving a one inch head space).

I think spaghetti squash tastes a lot like cushaw, so my guess is it will make a yummy pie.  So, I wanted to freeze some for future pies.  To do this, I pureed the cooked squash in my blender. I had to add a tiny bit of water.  Then I stored the puree into a freezer bag. I froze 2 cups at a time, enough for one pie.

Some interesting facts about squash:
*There are two types of squash, winter and summer. Spaghetti squash, as well as butternut, acorn and others are winter squash. Winter squash have harder skins (you'll learn this when you go to cut it in half!) and summer squash (zucchini) are softer. Summer squash retain more water and will last about a week in the fridge. Some winter squash will last months in a cool, dry basement. Spaghetti squash will last one month when stored this way. (obviously, this is BEFORE you cut it open, etc)

*Squash is a good source of vitamins A and C (the seeds are good for Vitamin E), magnesium, potassium, calcium (about 10% DV), beta carotene and antioxidants.  Low caloric to boot, all these make for a healthy and delicious dish!

Have you ever grown your own squash?  What's your favorite? How do you preserve it?